Installing GOAD

Walking through how I set up the Game Of Active Directory lab using VMware Pro on a Windows host.
GOAD is a lab enviroment built for pentesters with alot of misconfigurations to practice different attack methods and techniques.
As described on their repo:
The lab intend to be installed from a Linux host and was tested only on this. Some people have successfully installed the lab from a windows OS, to do that they create the VMs with vagrant and have done the ansible provisioning part from a linux machine.
So I had two options:
- Install it on any linux distro and have nested VMs which will slow everything down
- Figuring out how to set it up on a Windows, as mentioned that some fellas already managed to successfully install the lab from a Windows host.
What will we need?
- Windows host with vagrant installed to download the Windows server 2019 VMs (which I skipped and I will explain later)
- Ubuntu or any Linux distro to run ansible playbooks scripts
- I installed the GOAD-light which will have 3 VMs (1 forest and 2 domains):
- DC01 — kingslanding
- DC02 — winterfell
- SRV02 — castelblack
which is shown in the schema below: 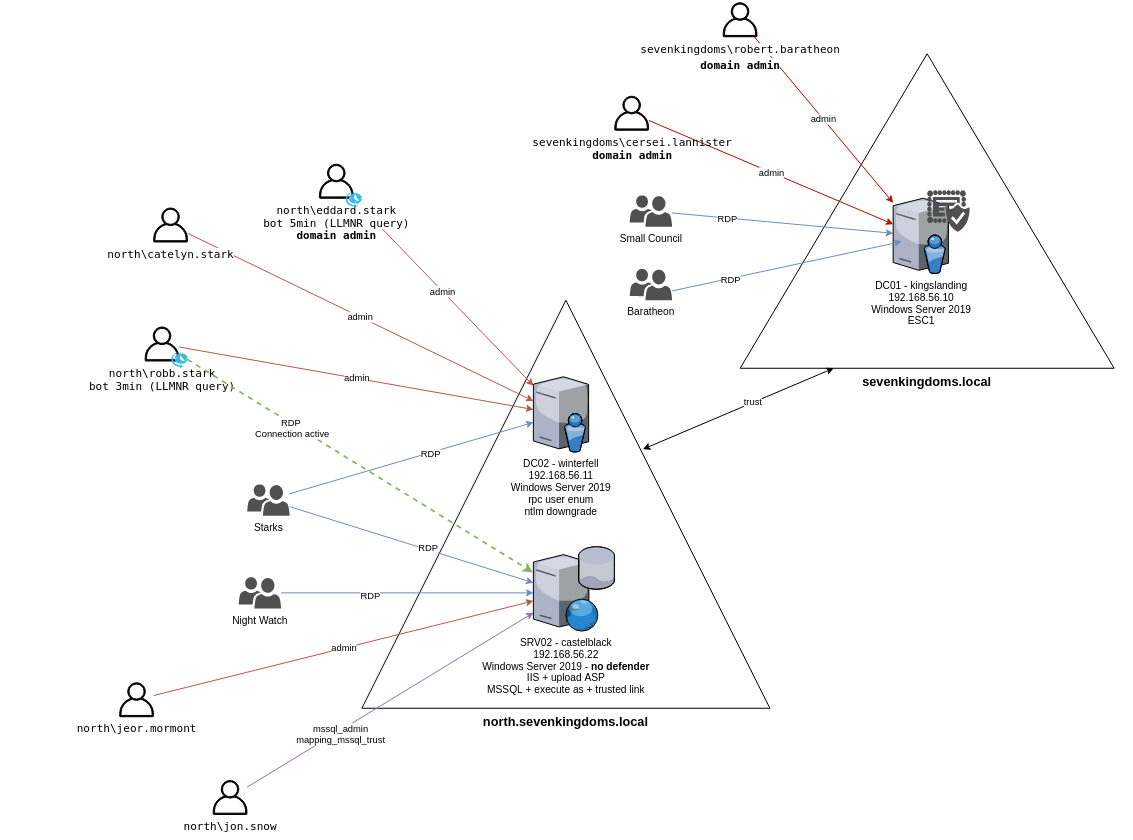
So the process will work as follows:
- Installing the VMs and configuring them
- Provisioning
- Fixing errors
Installing VMs
As I said earlier I skipped the vagrant part to download the VMs because I already had a Windows 2019 iso image. So, I installed them on VMware like any normal Windows server with default settings. But in order for them to work we had to tweak things a little.
Upon examining the Vagrant file, I discovered that the three VMs are assigned the default IP addresses listed below:
- GOAD-DC01: 192.168.56.10
- GOAD-DC02: 192.168.56.11
- GOAD-SRV02: 192.168.56.22
So the network configuration will be as the following:
- First network adapter to put the 3 VMs and Ubuntu VM on a same host-only network.
- Second network adapter to put the 3 VMs and Ubuntu VM on a NAT network.
then manually set static IP for each Windows server sequentially.
Important note: I had to change the name of
Ethernet0toEthernet1andEthernet1toEthernet2, because ansible will treatEthernet1as the192.168.56.xx(Host-only adapter). TheEthernet2one will be the NAT (for provisioning purposes). Or change it from the inventory file.
If you check the inventory file you will see that it uses winrm protocol with user account vagrant and password vagrant. Accordingly, I added this user to each of the 3 VMs and added them in the Administrators group. which is verifiable using:
1
whoami /groups
Secondly I configured winrm on the VMs using the following:
1
2
3
4
5
winrm quickconfig
winrm set winrm/config/service/auth @{Basic="true"}
winrm set winrm/config/service @{AllowUnencrypted="true"}
New-NetFirewallRule -Name "Ansible WinRM" -DisplayName "Allow WinRM" -Protocol TCP -LocalPort 5985 -Action Allow
New-NetFirewallRule -Name "Ansible WinRM" -DisplayName "Allow WinRM" -Protocol TCP -LocalPort 5986 -Action Allow
In order to check the connection between the VMs, I lastly enabled File and Printer Sharing (Echo Request - ICMPv4-In) from firewall incoming rules. This allows ping requests using the ICMP protocol.
Now its time for configuring the Ubuntu VM:
- Clone the GOAD repo:
1 2
git clone https://github.com/Orange-Cyberdefense/GOAD.git cd GOAD/ansible - Creating a Python virtual enviroment:
1
python3 -m venv goad-venv - installing ansible dependencies:
1
2
python3 -m pip install ansible-core pywinrm
ansible-galaxy install -r requirements.yml
The Windows servers and Ubuntu VMs are now set up.
Provisioning and fixing errors
Now for the errors, the final and most unpleasant phase.
I started the ansible playbooks scripts
1
ansible-playbook -i ../ad/GOAD-Light/data/inventory -I ../ad/GOAD-Light/providers/virtualbox/inventory main.yml
but I encountered this error: 
So it is trying to use HTTPS and port 5986 but it can’t
I first checked if winrm was working and the creds are valid by running evil-winrm tool
1
evil-winrm -u vagrant -p vagrant -i 192.168.56.10
which has worked.. Then I checked again ../ad/GOAD-Light/providers/vmware/inventory file and I noticed that the two lines below had been commented out:
1
2
# ansible_winrm_transport=basic
# ansible_port=5985
All I had to do was to uncomment them. 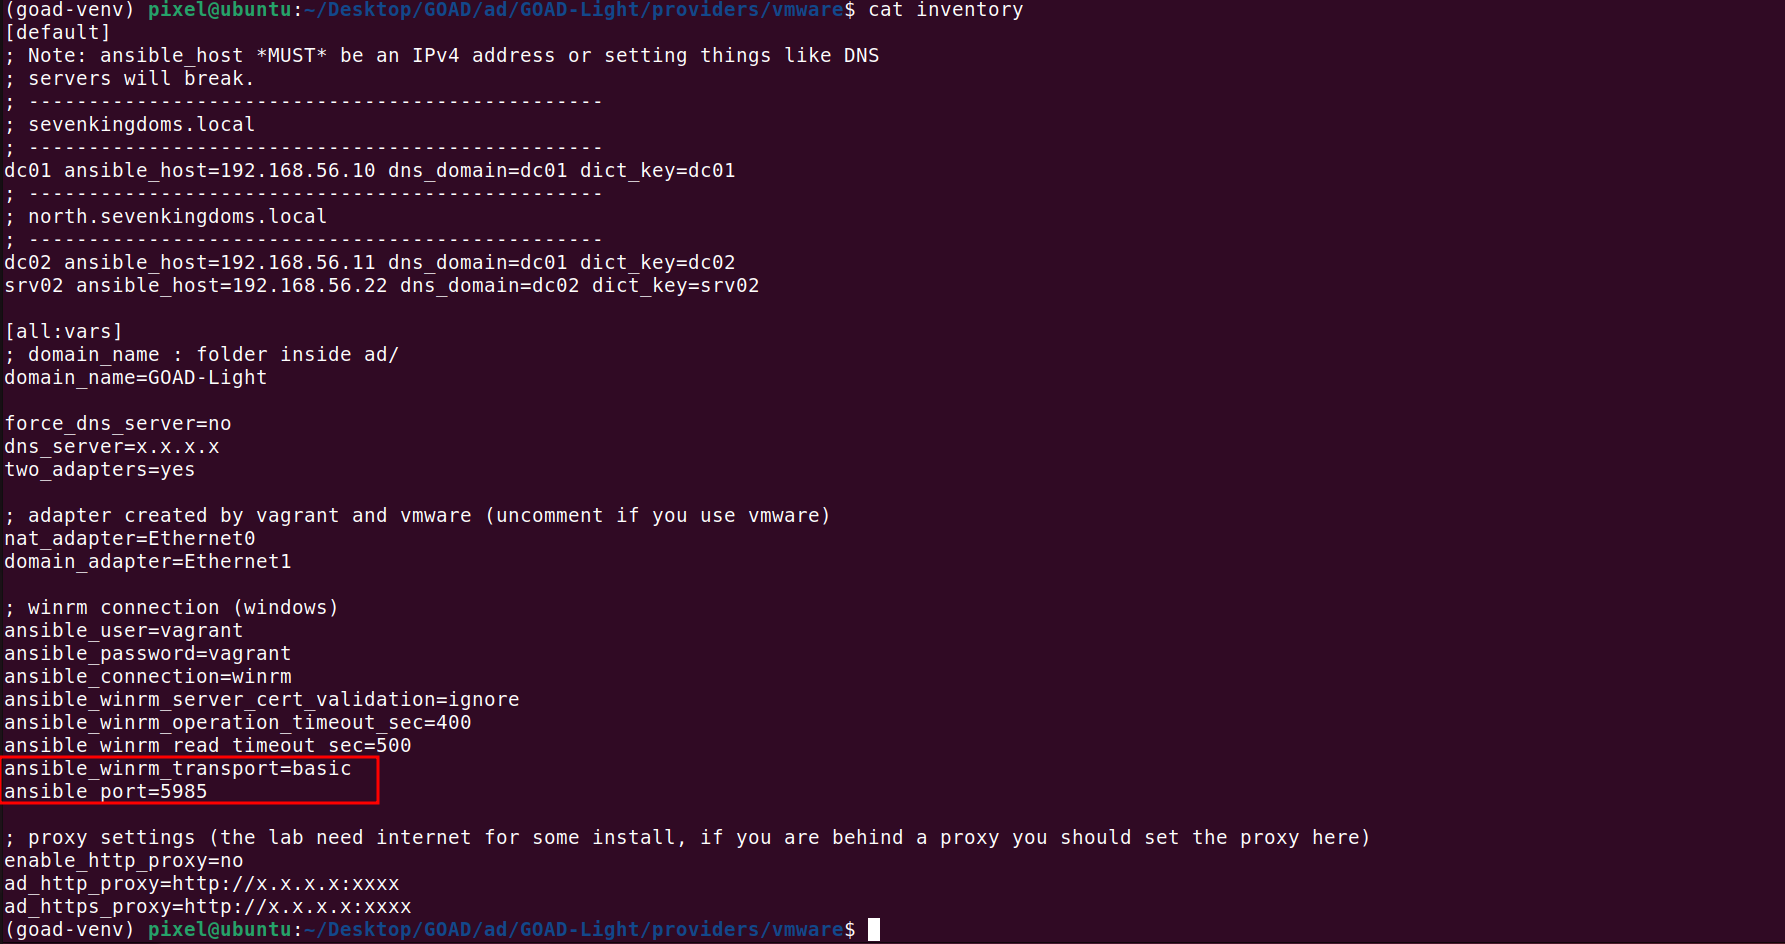 It then succeeded in connecting to it using
 winrm
Then I got this error on DC02: 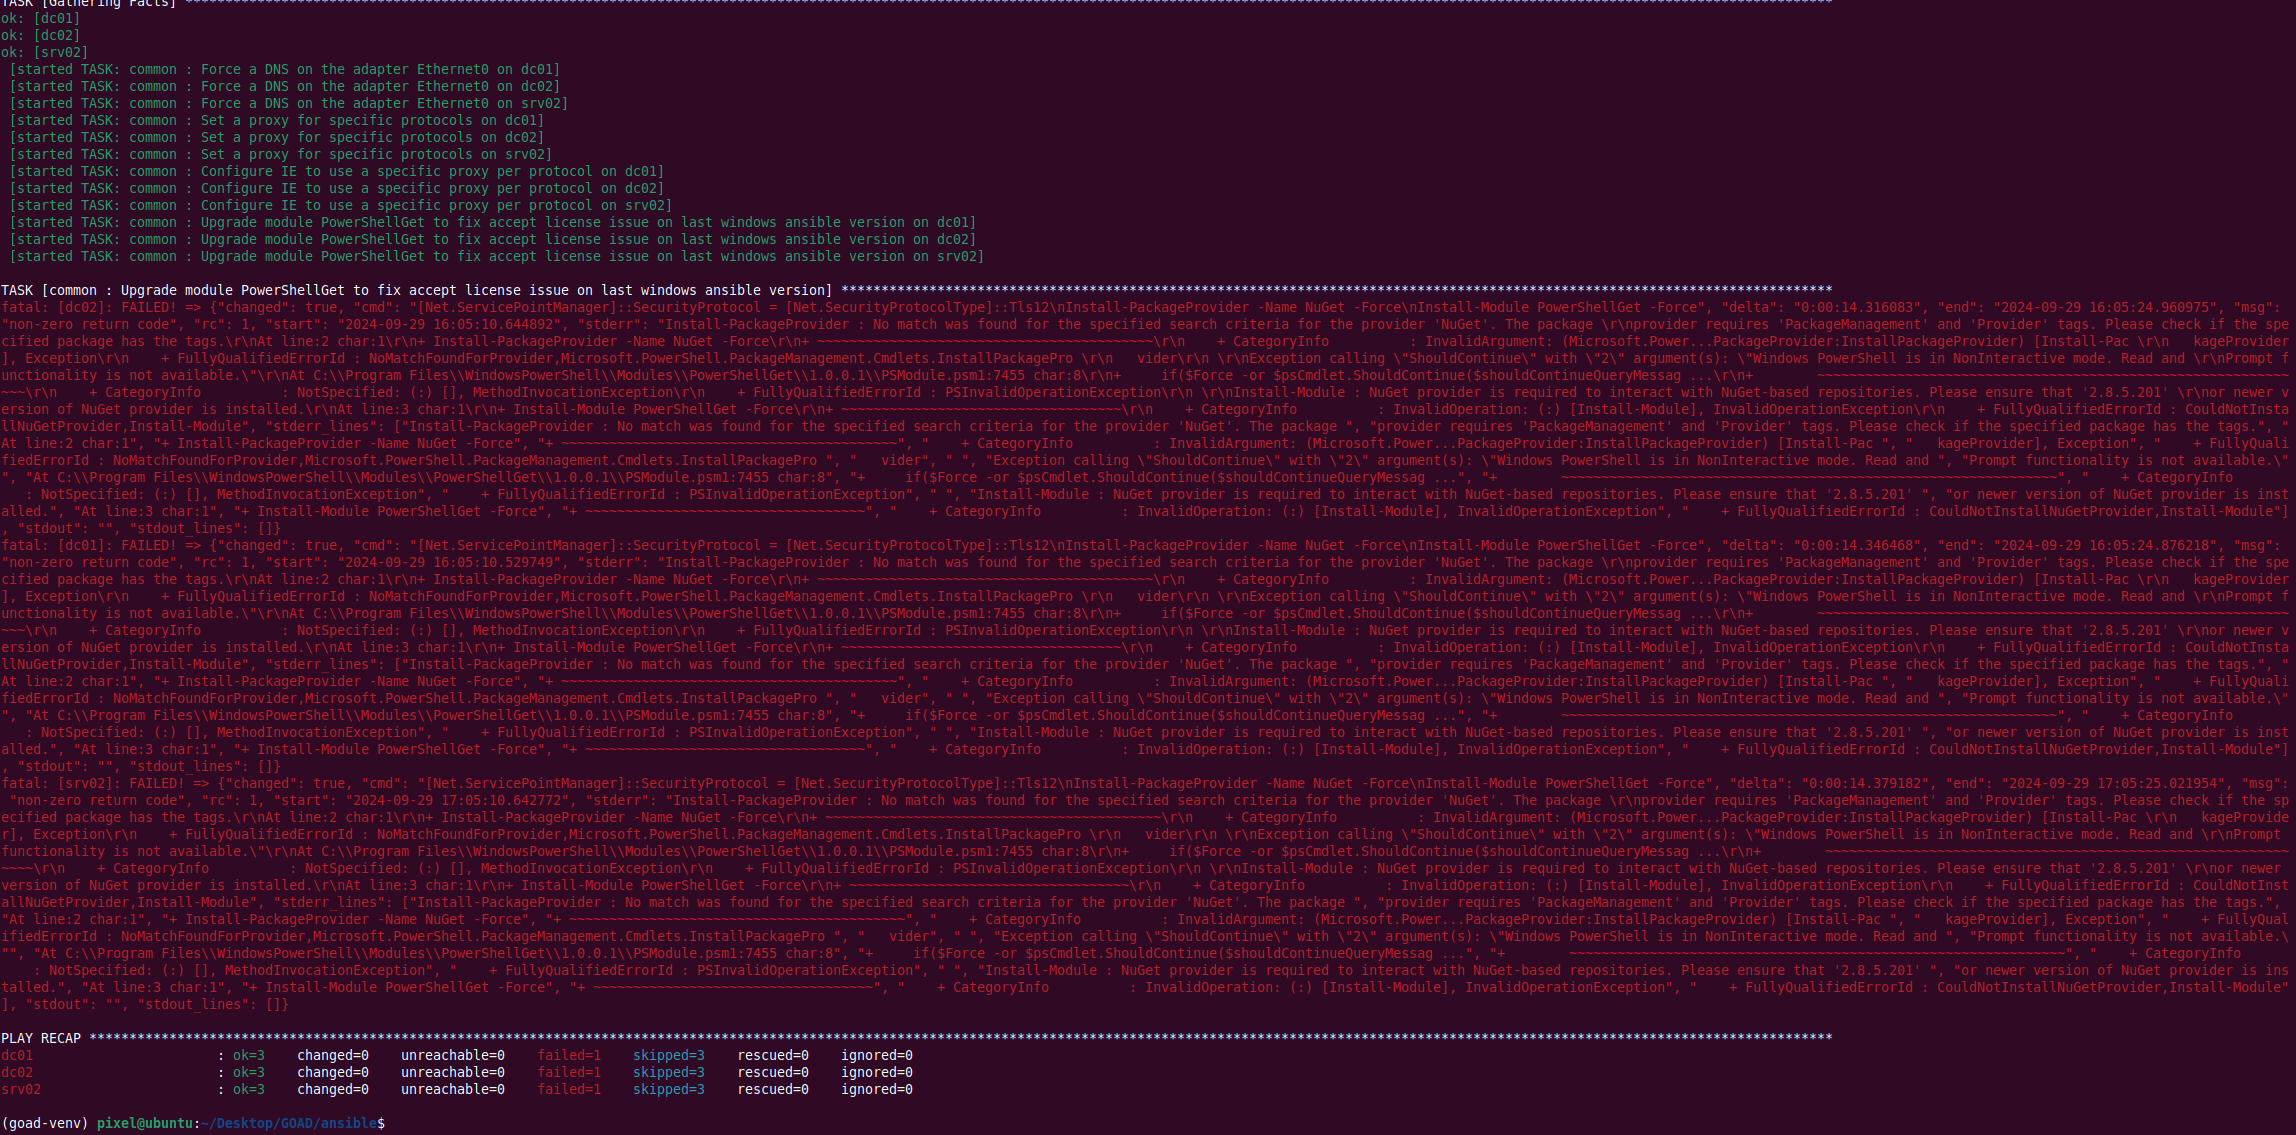 I tried to install it with a powershell as admin:
1
Install-Module -Name NuGet
But It didn’t. So I went to powershell_gallery. downloaded the nukpkg file, extracted it and it add to modules path which can be checked by:
1
$env:PSModulePath -split ';'
Check to see if it was installed properly:
1
Get-Module -ListAvailable -Name PowerShellGet
 and it worked!
Again on DC02:  The script couldn’t install the DNS server on it’s own. So I manually installed it
1
Install-WindowsFeature -Name DNS
Lastly I had some problems on SRV02 with IIS setup, which was caused because of .NET Framework was not installed. I tried to install it using powershell:
1
Install-WindowsFeature -Name NET-Framework-Core
However, it didn’t, and after some research, I managed to install it by allowing the virtual machine to install Windows updates as it contains various .NET Framework versions. The remainder of the installation is then handled by the script.
Then The playbooks operate without a hitch with these corrections. 
I verified that DC02 was successfully assigned to the domain (since it had the highest number of errors):
1
[System.DirectoryServices.ActiveDirectory.Domain]::GetComputerDomain()
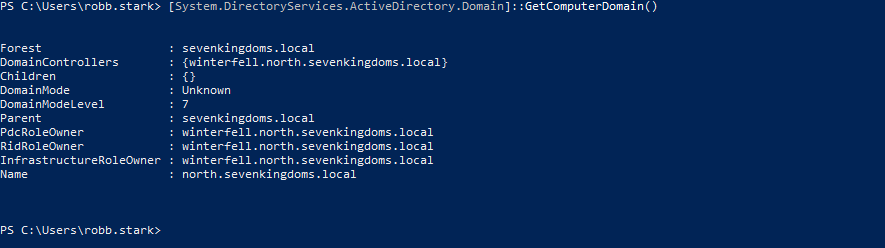 Using
Using netexec to verify: 
Now everything is set up!
I’ll be posting more on how to take advantage of this lab.